Make BB/GB source more easier with EbSynth

Few days ago, I saw this post on maimai's blog, using software called EbSynth to generate BB/GB source more easier.
I was quite amazed at it's quality and convenience, so I will show how to use this software in English version. Furthermore, I will test various videos, and anime clip
to show which clip is worked best or worse in EbSynth.
Table of contents
What is EbSynth?
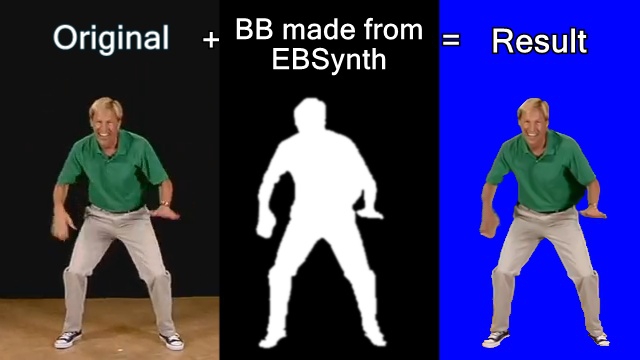
Originally, it's a software which changes the mood of video clip based on one frame of picture. Video from official sites will make it more easier to understand.We will
apply this to BB/GB of one frame.
Download
Download zip file from official EbSynth site and unzip it to any folder.

|
| The zip file are composed by these files. |
Making a image sequence
To make source, you need image sequence of video clip. There are various method to do this, so I will upload some tutorials on here.
Using Vegas
https://youtu.be/Yw0dOzZ5aLI
https://youtu.be/Yw0dOzZ5aLI
Using After effects
https://youtu.be/6CSPTuRjgwU
https://youtu.be/6CSPTuRjgwU

|
| Result of rendering |
There are online sites which makes image sequence from video like here, but I will not introduce the method in this post.
Using EBSynth
If you use EBSynth, you need a frame that has already turned into BB/GB. Because EBSynth make blue-screened source based on that frame. It could be any frame, and
could be done by Photoshop, gimp(free), or etc. (Also you could done with Vegas or AE.) I use Photoshop in this post because it has quick selection tool which makes
work faster.

|
| I chose 13th frame because it shows whole body well. |
※ It seems different bg color makes the difference of quality like this.
【無料ツールのみ】
— あるくおすし (@walkingsushibox) September 9, 2019
簡単に動画を切り抜く方法。
単色背景以外でも可能です。
必要なもの:
AviUtl
XnConverter https://t.co/lHNdSEhnZ9
GIMP(画像編集ソフトならなんでも) https://t.co/ktOE75CJ8O
EbSynth https://t.co/CVzMEbWqey
※キーフレームの設定によっては失敗する場合もあります。 pic.twitter.com/QOLRTE4UhR
Then make another folder where image sequence folder exists, and put the blue-screened frame in that folder with same name of original frame.


|
| Preparing is finished. |
Open EbSynth.exe. You could see two main section, top one for put sources, and bottom one for rendering.

First, drag and drop folder to top section. Put image sequence folder in "Video: ", and put blue-screened folder in "Keyframe: ". EbSynth will recognize folders path
automatically.

Then, set the region in bottom section. It will automatically detect the all thing, but you could change starting or ending point by changing number in "Stop: ". Also,
"Keyframe: " is the frame number of blue-screened picture. You could choose this to another number if you have another blue-screened picture.
Also the output folder will be automatically created when you D&D folders. But you could change the path and file name in "Output:".
Finally, click "Run All" and make it will create image sequence in folder. It'll take some time. (Higher resolution, longer time to finish.)

Then you could import this image sequence to Vegas or After effects. Also there are tutorials for this.
Using Vegas
https://youtu.be/cK0rGoKwJ40
https://youtu.be/cK0rGoKwJ40
Using After effects
https://youtu.be/79Xw5_E5CIk
https://youtu.be/79Xw5_E5CIk
Making better results
If you see the result firstly, some of the pictures are not well blue-screened because EbSynth can't generate blue-screen of non-existed thing like back of the arms. So
I made same sequences with another frames, and combined them on Vegas.

|
| horrible first result |

|
| I combined four sequences together. |

|
| Rendering multiple sequences. |
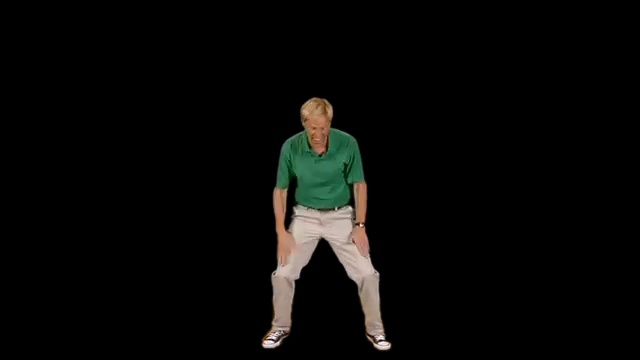
And the final result is this.

|
| Green_shirt_guy_dancing.gif |
If you compare this with original one, you could see pixels of some frames are crushed. Also transition between multiple sequences is not seamless. Because it doesn't
work well on dynamically moving clips, or having low-contrast color compared to background.
So, I'll make these result as mask, and clip over to the original video to make the better results.
Thanks for cldgonz to report this method to me!
Using Vegas for masking
First, put the clip made by EBSynth into the track and apply the Chroma Keyer effect in Video fx. Then, raise the Low threshhold value and lower the
High threshold value to remove the background neatly, and check Show Mask Only so that the background is white as follows. You could adjust the Blur mount
to make the border a little smoother.
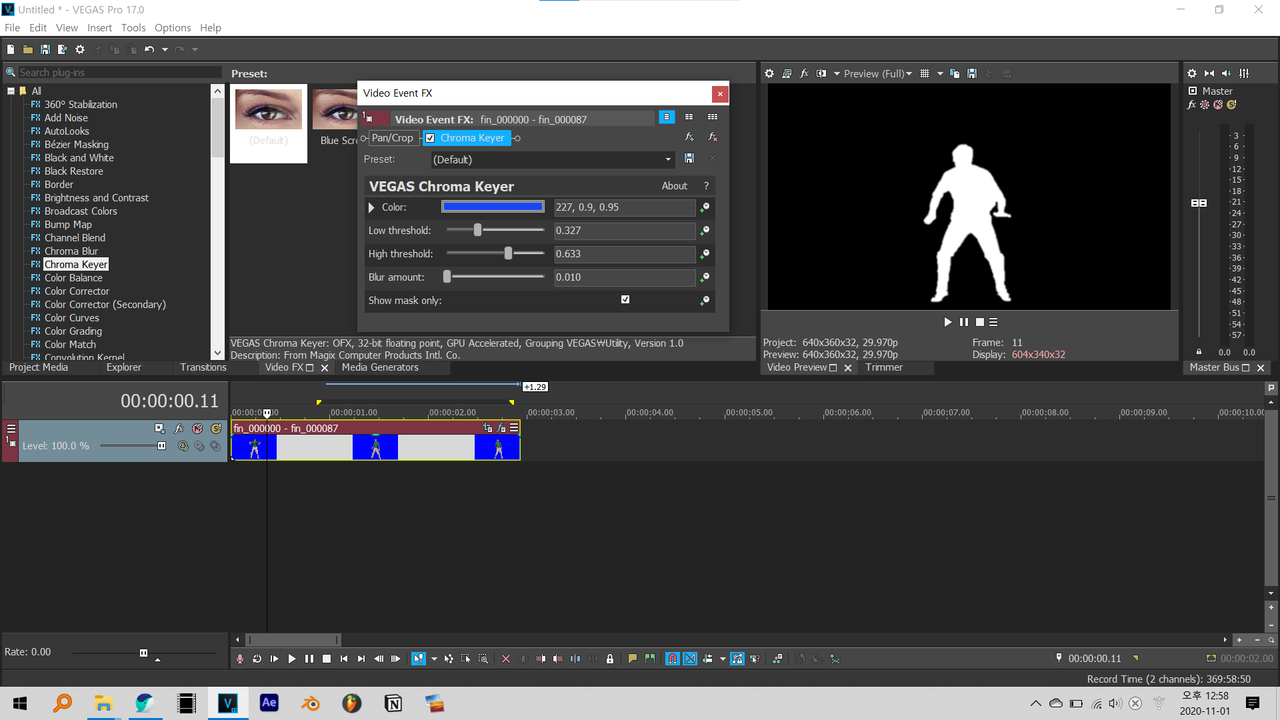
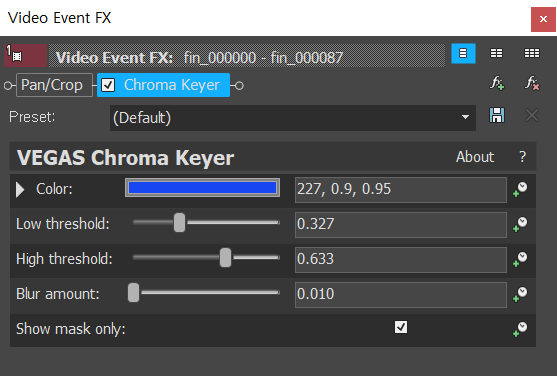
|
| This is my setting. Numbers could be changed. |
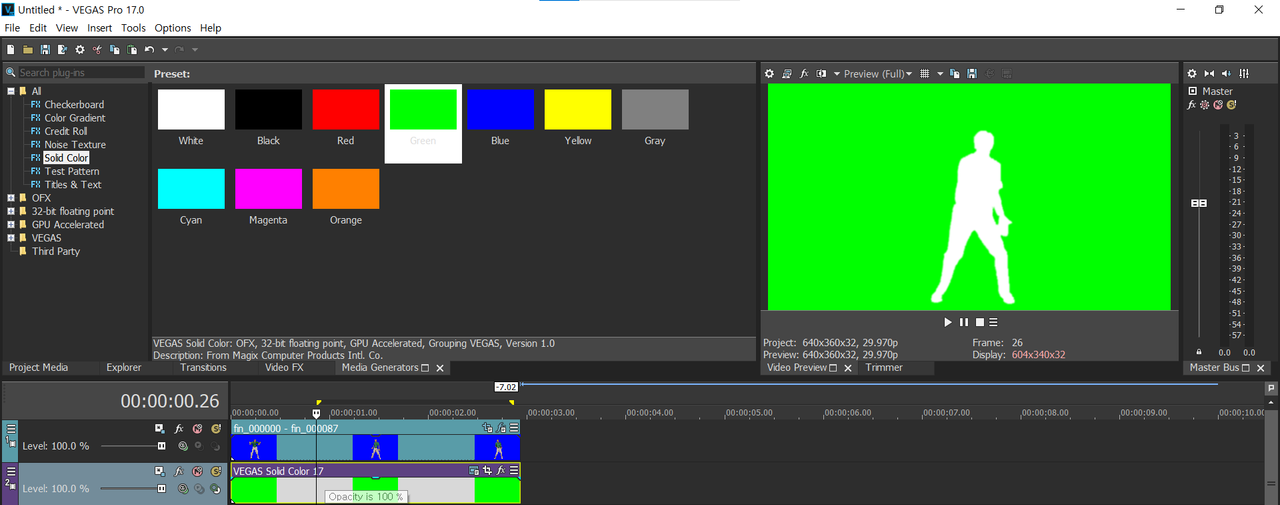
|
| To check if the effect is applied well, I recommend to put the appropriate picture or video in the background. |
Then create a new track under that track, insert the original video, then click the icon in the red square in the left picture to make the original video become a child
track of EBSynth-ed video.
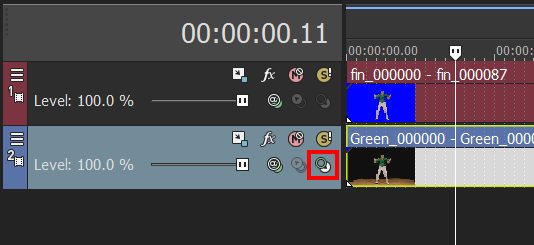
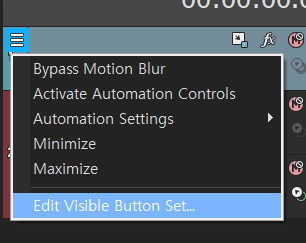
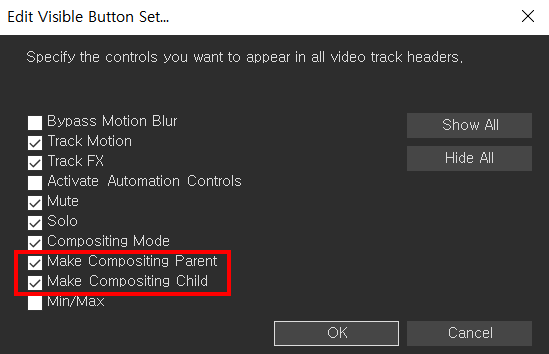
If you can't see this icon, just click the three-lined rectangular icon in the top left of the track and go to Edit Visible Button Set.... And check
Make Composing Parent and Make Composing Child in the window that appears, and then press OK. (Based on Vegas 17.)
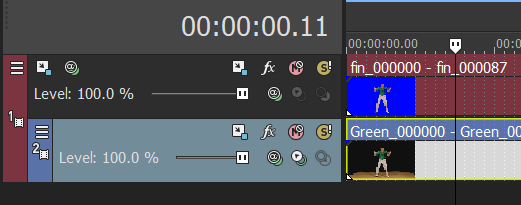
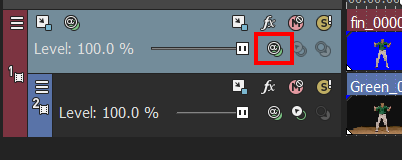
And if you click the icon in the red square in the picture below on the track with the EBSynth-ed video and select Multiply(Mask), you can see that the video
become a mask of the original image like the third picture. If you can't find this icon too, then go to Edit Visible Button Set... again and check Compositing Mode.
Now, you can create another blue background, and then render it to make a better blue-screened video.
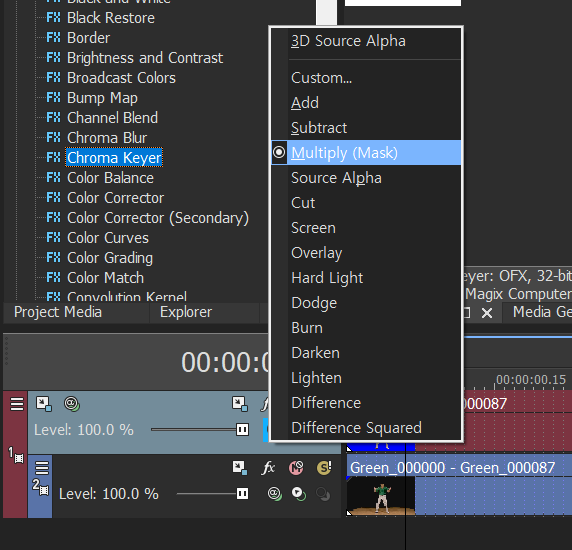
Using After Effects for masking
First, put EBSynth-ed video into new composition and then chroma key with effects such as Keylight or Color key.

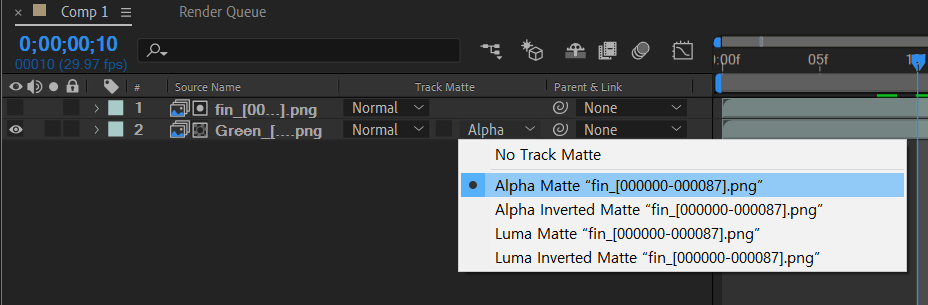
Then, put the original image under EBSynth-ed layer and set the Track Matte of the original image to Alpha Matte. If you can't see Track Matte, you
can set the Track Matte to show by clicking the Toggle Switches/Modes icon at the bottom of the program.
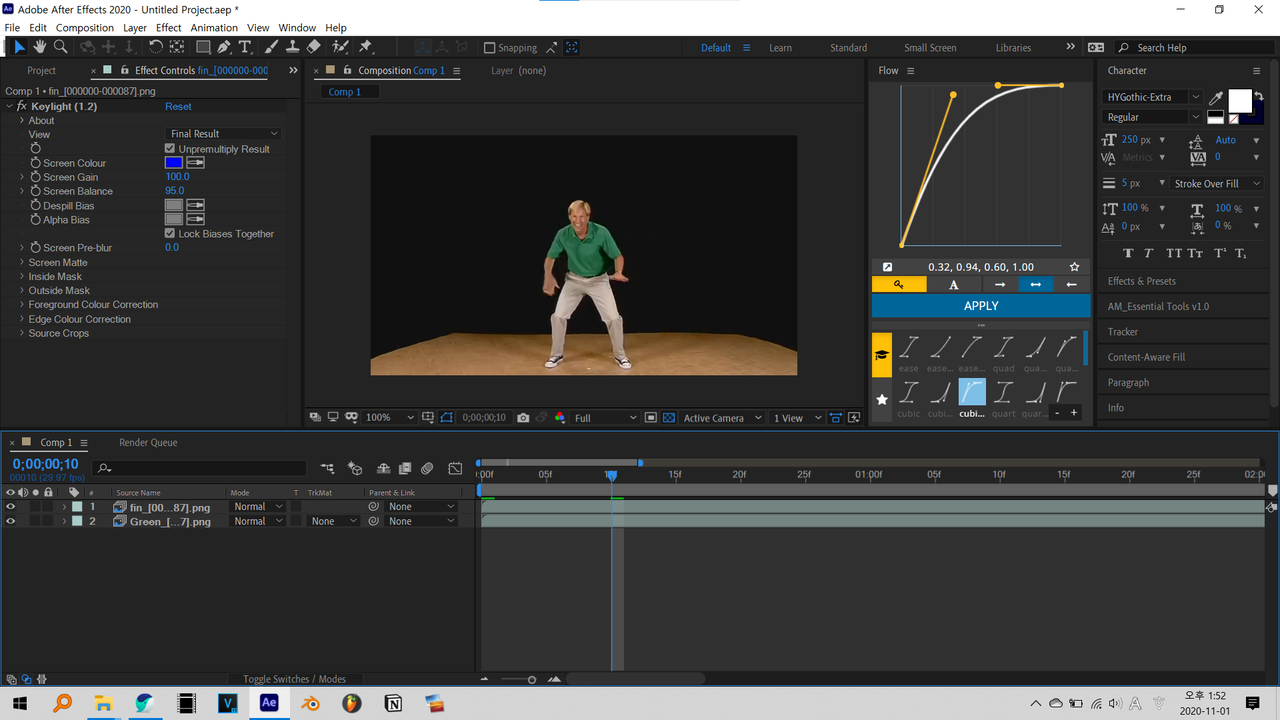

You can put a blue background under the layer and render it as an image.

Example videos
If you have well-conditioned clip, it will make pretty good result like these tweets.
Maimai's test
EbSynthテスト。 pic.twitter.com/tZz8x5RROU
— [ ま い ま い ] (@Maimai22016) September 15, 2019
Ruggy's test
Cool little tip:
— ruggy (@Roughyyy) August 29, 2019
You can use ebsynth to roto out a background, and it's way easier than rotobrush, mocha, masking, etc.
I just made 4 keyframes to get this. Only needs little bit of clean up, and it'd be near perfect. pic.twitter.com/QXv3JEBTc9
Conclusion
It is certainly good program, which makes annoying work to semi-automatic work. but you need little bit of adjustments to make it more better. And it took time to
render it because of running time of A.I. But I recommend it if you want to make simple BB/GB.
Thanks for reading my post.
▲
▲
Comments
Post a Comment